We oftentimes overlook our white balance setting whenever we take photographs. This is probably one of the main reasons the colors in the images we capture look too orangey, too blue, or too yellow. It is a dead giveaway for being amateurish and it is the most appalling way to ruin a beautiful subject or scene. Getting the colors right in photography is important to capture the pure essence of your subject, if not enhance it.
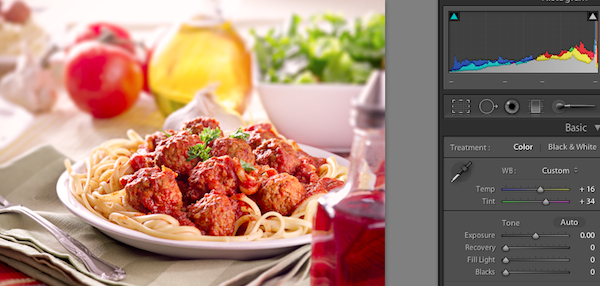
There are different sources of light and there are many ranges of color temperatures to use, from the lightest and coolest of blues to the warmest of yellows. Choosing the correct type will help cast the proper lighting to capture an image. Our eyes automatically adjust to the differences in color temperatures unlike digital cameras. Sometimes, we need to make slight changes in the settings to make the lighting just right. You'll notice in the first photo above in comparison to the side by side that the "yellow" in the spaghetti is more apparent.
{Warm Tones using Light Room First Photo Warm Temp + 16 Tint +34}
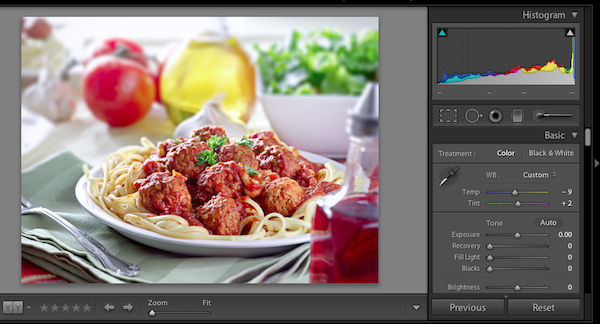
Left Photo Warm Right Cool


Here are a few simple tips to get the perfect white balance in your Lightroom:
Tip 1 – Use the drop down menu in Lightroom to change the white balance.
The drop down menu in Lightroom will give you a number of options. Your camera is equipped with the same type of settings. Try previewing each of these settings to determine the type of outcome you get in your images.
Tip 2 – Get to know what sliders can do for your images.
Lightroom has two slider options for white balance correction:
Tint – is best utilized to temper the green and magenta. It would be better to use the temperature slider to initially adjust the color and the slider for tin will neutralize whatever tints of magenta and green are left.
Temperature – the temperature slider adjusts the color temperature. Moving the slider to the left will make the colors cooler while moving the slider to the right will give the image a warmer color cast.
{Cool Tones Temp -9 Tint + 2}

Tip 3 – The wonders of the dropper tool.
The dropper tool in Lightroom usually works with neutral colors, especially neutral gray, to correct your photo’s white balance. Click on the dropper tool in the WB window and hover it over the image you are working on. If your shot does not have gray areas, doing this will help you find the areas where the R, G, & B have equal values.
Photoshop vs. Photoshop Elements
Photoshop and Elements are two other programs you can use to magically transform your photographs into works of art! Many people say Photoshop is the best because it offers a lot more that Elements. It also costs a LOT more! More may not necessarily mean the best for you. It all depends on what you need.
Photoshop is everything you could ever want in a professional, full feature program. It comes with Paint Shop Pro and Elements. It give you a broad spectrum of functions you may need such as a 16 –bit support, an array of color management options, layer compositions, animation, non- square pixels, HTML exports, slices, large images custom CMYK separations and a whole bunch of other things I cannot even begin to comprehend. The whole program is pretty much hardcore! It can be daunting for a user with basic needs.
Photoshop Elements is adapted from Photoshop. It does away with some of the more elaborate features of Photoshop and keeps the core functions any ordinary Tom, Dick, Harry, or a Jane would care to use such as Channel Mixer, Curves, CMYK, Color Balance, calculations, running actions, and channels By removing some of the more complex features that give us the best part, it’s a whole lot cheaper. It still comes out as a powerful package that doesn’t sacrifice the quality of your work.
 We oftentimes overlook our white balance setting whenever we take photographs. This is probably one of the main reasons the colors in the images we capture look too orangey, too blue, or too yellow. It is a dead giveaway for being amateurish and it is the most appalling way to ruin a beautiful subject or scene. Getting the colors right in photography is important to capture the pure essence of your subject, if not enhance it.
There are different sources of light and there are many ranges of color temperatures to use, from the lightest and coolest of blues to the warmest of yellows. Choosing the correct type will help cast the proper lighting to capture an image. Our eyes automatically adjust to the differences in color temperatures unlike digital cameras. Sometimes, we need to make slight changes in the settings to make the lighting just right. You'll notice in the first photo above in comparison to the side by side that the "yellow" in the spaghetti is more apparent.
{Warm Tones using Light Room First Photo Warm Temp + 16 Tint +34}
Left Photo Warm Right Cool

 Here are a few simple tips to get the perfect white balance in your Lightroom:
Tip 1 – Use the drop down menu in Lightroom to change the white balance.
The drop down menu in Lightroom will give you a number of options. Your camera is equipped with the same type of settings. Try previewing each of these settings to determine the type of outcome you get in your images.
Tip 2 – Get to know what sliders can do for your images.
Lightroom has two slider options for white balance correction:
Tint – is best utilized to temper the green and magenta. It would be better to use the temperature slider to initially adjust the color and the slider for tin will neutralize whatever tints of magenta and green are left.
Temperature – the temperature slider adjusts the color temperature. Moving the slider to the left will make the colors cooler while moving the slider to the right will give the image a warmer color cast.
{Cool Tones Temp -9 Tint + 2}
 Tip 3 – The wonders of the dropper tool.
The dropper tool in Lightroom usually works with neutral colors, especially neutral gray, to correct your photo’s white balance. Click on the dropper tool in the WB window and hover it over the image you are working on. If your shot does not have gray areas, doing this will help you find the areas where the R, G, & B have equal values.
Photoshop vs. Photoshop Elements
Photoshop and Elements are two other programs you can use to magically transform your photographs into works of art! Many people say Photoshop is the best because it offers a lot more that Elements. It also costs a LOT more! More may not necessarily mean the best for you. It all depends on what you need.
Photoshop is everything you could ever want in a professional, full feature program. It comes with Paint Shop Pro and Elements. It give you a broad spectrum of functions you may need such as a 16 –bit support, an array of color management options, layer compositions, animation, non- square pixels, HTML exports, slices, large images custom CMYK separations and a whole bunch of other things I cannot even begin to comprehend. The whole program is pretty much hardcore! It can be daunting for a user with basic needs.
Photoshop Elements is adapted from Photoshop. It does away with some of the more elaborate features of Photoshop and keeps the core functions any ordinary Tom, Dick, Harry, or a Jane would care to use such as Channel Mixer, Curves, CMYK, Color Balance, calculations, running actions, and channels By removing some of the more complex features that give us the best part, it’s a whole lot cheaper. It still comes out as a powerful package that doesn’t sacrifice the quality of your work.


Ambika
March 5, 2012 at 1:08 am //
A great post M & C!!! Very helpful tips!
myfudo
March 5, 2012 at 7:51 am //
Thank you Ambika!
Yudith @ Blissfully Delicious
March 5, 2012 at 8:04 am //
Thanks for all of the tips! :)
myfudo
March 5, 2012 at 8:35 am //
No problem Yudith, thank you for commenting.
the food dude
March 5, 2012 at 10:48 am //
I still have so much to learn to improve my photos, thanks for sharing this info!
myfudo
March 5, 2012 at 3:56 pm //
We are so happy you are enjoying the tips, if you have any questions we’ll try and get a tutorial up = )
Becky
March 5, 2012 at 1:58 pm //
These are great tips….I am an awful photographer and still struggling with the pictures for my blog but I will keep trying to improve!! ;)
myfudo
March 5, 2012 at 3:56 pm //
Hi Becky, thank you for commenting. May I ask what kind of camera you have? We are so happy you are enjoying the tips, if you have any questions we’ll try and get a tutorial up = )
Julie A
March 5, 2012 at 2:06 pm //
I wish I had photoshop. Can you do a tutorial for Picnik ;)
Great photos!
myfudo
March 5, 2012 at 3:58 pm //
Hi Julie, are you on a mac or pc? Picnik will be closing down after April, have you thought about maybe getting photoshop elements? It’s reasonable, it supports actions, but if you primarily want an editing program for just photos, Lightroom is the way to go.
We are so happy you are enjoying the tips, if you have any questions we’ll try and get a tutorial up = )
Cindy
March 5, 2012 at 3:06 pm //
Great post! Thanks for sharing the tips!
myfudo
March 5, 2012 at 3:58 pm //
Thank you Cindy.
kitchenriffs
March 6, 2012 at 2:48 am //
Good tutorial. I usually don’t do it, but you can also shoot a white card and set custom white balance in your camera. I actually sometimes bump up the yellow in pictures a bit because I want a warm, sunny tone (have to be careful, though). PhotoShop is a great program but overkill for most people – if I didn’t already have it, I’d never buy it now. I think Lightroom is all most people will ever need. Thanks for this.
myfudo
March 6, 2012 at 7:49 am //
It’s wonderful that presets are becoming more and more available, I do like the actions in photoshop which lends itself, but I think the next upgrade with lightroom will have some nice changes. There are a lot of free presets out there (which is wonderful). Thanks so much for commenting.
Kiri W.
March 6, 2012 at 7:55 am //
Great info! :) I have so much to learn about photography!
myfudo
March 6, 2012 at 9:40 am //
You are welcome Kiri! I was about to send you an e-mail letting you know you were the winner of the book giveaway = )
Nami | Just One Cookbook
March 6, 2012 at 9:29 am //
Thank you so much for the tutorial. I use lightroom but my husband has been helping me edit as I’m still learning how to use it. I need to play with more pictures and to get a hang of it. Thank you for the helpful tip!
myfudo
March 6, 2012 at 9:42 am //
You’re welcome Nami, let us know if you need any help or a tutorial you’d like to see us cover and we’ll do our best to try and get one up.
Alaiyo Kiasi
March 6, 2012 at 9:56 am //
What a coincidence–I’m currently using trial versions of Lightroom and Photoshop Elements. This is quite a helpful post. It also helps me to realize that I’m using the features correctly. So far, I’m leaning toward Lightroom!
myfudo
March 6, 2012 at 10:20 am //
Hi Alaiyo, lightroom in my opinion is a very powerful program, while photoshop is too, for editing photos (not manipulation) lightroom is a wonderful application. They have a lot of presets available now too.
Griffin's Grub
March 7, 2012 at 12:39 am //
Thanks for the tips. I guess I need to start looking into some kind of photo editing software. Do you suggest elements or lightroon?
myfudo
March 7, 2012 at 7:44 am //
Hi Griffin, I would definitely recommend LightRoom 3 for photo editing, for photo manipulation, elements will offer a bit more, but now Lightroom has many presets (like Photoshop has action sets) that will work for any photographer, most of the photographers I speak with use Lightroom for their editing and post processing. Let us know which you decide and we’ll try to get some more tutorials up. Thank you so much for commenting.
Richa@HobbyandMore
March 7, 2012 at 8:14 am //
i tried lightroom last year some time and it is such a heavy software and too many options.. i just gave up on it.. but picasa an dpicnik are not living up to the my photgraphy learning curve for sure..
Cat Davis
March 7, 2012 at 2:29 pm //
Lightroom is the one program I haven’t invested in yet that I really want to. My problem is I start adjusting colors so much that I forget what the image “should” look like.
myfudo
March 7, 2012 at 8:43 pm //
Hi Cat, have you given the trial a try yet? What program are you using for post processing? Thank you so much for commenting.
Lan
March 7, 2012 at 11:00 pm //
i’ve been using picnik for awhile but because it’s shutting down i received Light Room as a gift. it is HARD. i spent a few very frustrating hours over the weekend trying to learn, watching tutorials on youtube. i fear that i’ll never get it, or best case, it’ll force me to take such good pix that i don’t require post processing.
thank you for the tips, i hope you continue the series.
Sandra ~ Sweet Sensations
March 13, 2012 at 9:29 pm //
This was very helpful, thank you.
Sandra ~ Sweet Sensations
March 13, 2012 at 9:29 pm //
This was very helpful, thank you.
Shakeel
August 28, 2012 at 10:24 pm //
I have the feeling cliatry in Lightroom is more like a High Pass sharpening. Although I do have to say that it also feels slightly different. With high pass sharpening you can really make a subject pop from contrast and sharpening. And as with all those tools you can overdo it and make such things like in the Nike ads material. Might be something for you to have a look at too :)
myfudo
March 8, 2012 at 8:54 pm //
Hi Lan, how are you? Yes that is true, PicNik will be closing come April. We will be continuing the tutorials, to help you get started, what would you like to learn first with Lightroom?
myfudo
March 8, 2012 at 8:54 pm //
Hi Lan, how are you? Yes that is true, PicNik will be closing come April. We will be continuing the tutorials, to help you get started, what would you like to learn first with Lightroom?
myfudo
March 10, 2012 at 1:56 pm //
Hi Richa, please don’t give up, once you get in there and find you way around, I think you’ll really love working with Lightroom. Is there something you wanted to in post processing with lightroom and we’ll try and cover it in our next tutorial.